Appears in
Pairs with
Pose · S
Bridge Pose
Setu Bandhāsana
A backbend you can hold with your feet on the floor and your shoulders down, which makes it the safest place to build the strength a deeper backbend will later need. The height of the lift matters far less than where the bend happens.
The shape, with joint angles
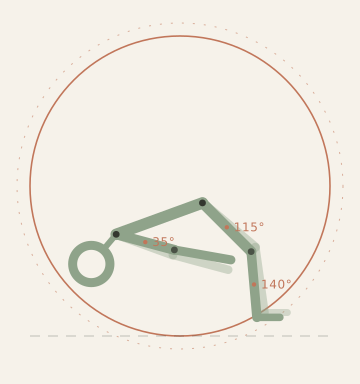
The angles are measured on the drawn skeleton and change with the variant you pick. Treat them as a starting reference, not a target to force.
Specification
| Sanskrit | Setu Bandhāsana |
|---|---|
| Also called | Setu Bandha Sarvangasana |
| Level | Beginner |
| Loads | Lower back · Hips · Chest · Spine |
| Props | Mat · Block · Blanket · Strap |
| Typical hold | 30 sec |
| Gaze | |
| Published | 1 September 2026 · By The Asana Desk |
Getting in
- 01
Lie on your back with the knees bent, feet hip-width and parallel, heels about a hand's width from the buttocks.
- 02
Let the arms rest alongside the body, palms down, and slide the shoulder blades under the back.
- 03
Press the feet down and lift the hips, keeping the knees pointing straight ahead rather than splaying out.
- 04
Stop lifting when the hips are level with the knees; going higher usually means the lower back is doing the work.
- 05
Roll the shoulders under, interlace the fingers behind the back if it is comfortable, and widen the collarbones.
- 06
Hold for 20 to 30 seconds, then lower one vertebra at a time on an exhale.
- 07
Rest for three breaths with the knees still bent before sitting up or repeating.
Working notes
Hips level with knees is the whole target
| Cue | Correct action | Fault it fixes |
|---|---|---|
| Knees over the heels | Track the knees forward, not outward | Knees splaying, which strains the inner knee |
| Tailbone toward the knees | Slight tuck before lifting | Lower back arching too early |
| Shoulders under the back | Slide the blades down before lifting | Weight resting on the neck |
| Feet parallel | Outer edges of the feet pressing down | Ankles collapsing outward |
The most common error in Bridge is lifting until the lower back arches instead of stopping where the hips can be held by the glutes and hamstrings. Once the pelvis goes above knee height, the lumbar spine extends further and the pose starts to look more impressive while working the wrong tissue.
A reliable test: pause at hip height and see whether you could hold that position for thirty slow seconds without your lower back complaining. If not, the lift is too high.
The supported version is not a beginner's shortcut
Placing a block under the sacrum and staying for two or three minutes is a different practice from the active lift. In the supported version the muscles can stop working, the front of the body opens passively, and the pose becomes a rest that also happens to be a backbend. Both versions belong in a home practice, and the supported one is usually the better choice after a long day.
Whichever version you use, come down slowly. Dropping the hips from a bridge puts a sudden load on the sacroiliac joint — the part of the pelvis that complains loudest and longest.
Self-checks
- Are the knees directly above the ankles?
- Is the weight on the shoulders rather than the neck?
- Can you breathe into the belly while lifted?
Safety
Skip or heavily modify the pose if any of these apply to you. When in doubt, ask a teacher who can see you move, or a clinician who knows your history.
- Neck injury or recent cervical surgery: do not put weight on the shoulders; use the supported version only.
- Sacroiliac pain or a recent pelvic injury: keep the lift very low and brief, or use the block version.
- Disc herniation in the lumbar spine in a flare-up: avoid backbends until it settles.
- Pregnancy after the first trimester: use the supported version and keep the lift small.
- Recent hip replacement: check with your surgeon before taking the hips into extension under load.
This page is informational only. It is not medical advice and no pose here is a treatment for any condition.
- A block under the sacrum for a supported hold of two to three minutes.
- Feet on a wall, legs bent, for a very gentle version with almost no load.
- A strap around the thighs just above the knees to stop them splaying.
- Arms alongside the body rather than interlaced, if the shoulders are tight.
Useful propsMat · Block · Blanket · Strap
- A block under the sacrum (low, medium or high) sets the height and lets the muscles rest.
- A strap above the knees keeps the thighs parallel with no effort.
- A folded blanket under the shoulders protects the neck and gives the arms somewhere to rest.
- Neck injury or recent cervical surgery: do not put weight on the shoulders; use the supported version only.
- Sacroiliac pain or a recent pelvic injury: keep the lift very low and brief, or use the block version.
- Disc herniation in the lumbar spine in a flare-up: avoid backbends until it settles.
- Pregnancy after the first trimester: use the supported version and keep the lift small.
- Recent hip replacement: check with your surgeon before taking the hips into extension under load.
Breathe into the belly rather than the chest; if the breath has to go shallow, the lift is too high.
- Five breaths is a reasonable first target; the exhale should not be forced.
- Keeping the ribs down while lifted is what protects the lower back.
- Come down on an exhale, not on a held breath.