Appears in
Pairs with
Pose · P
Plank Pose
Phalakāsana
A thirty-second pose that most people hold for ninety seconds badly. Plank is not an endurance test; it is a test of whether the ribs, pelvis and shoulders can stay in one line while the arms push the floor away.
The shape, with joint angles
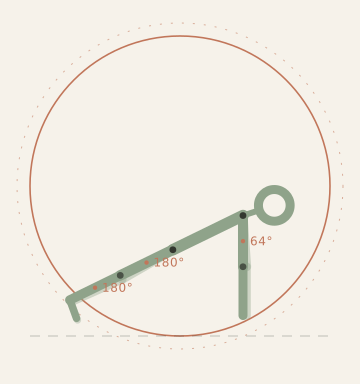
The angles are measured on the drawn skeleton and change with the variant you pick. Treat them as a starting reference, not a target to force.
Specification
| Sanskrit | Phalakāsana |
|---|---|
| Also called | Forearm Plank (Kumbhakasana) |
| Level | Beginner |
| Loads | Core · Shoulders · Wrists · Back |
| Props | Mat · Block · Wall |
| Typical hold | 30 sec |
| Gaze | |
| Published | 25 August 2026 · By The Asana Desk |
Getting in
- 01
From hands and knees, set the hands under the shoulders with the fingers spread.
- 02
Step one foot back, then the other, until the body is one long line from the crown of the head to the heels.
- 03
Press the floor away and let the space between the shoulder blades widen — do not let the chest sink between the arms.
- 04
Tuck the tailbone slightly so the lower back does not dip; the pelvis should feel level, not tilted.
- 05
Squeeze the inner thighs toward each other and reach back through the heels.
- 06
Hold for 20 to 30 seconds with even breathing, then lower the knees to the floor.
- 07
If the lower back starts to ache, come down immediately — that is the signal, not the shaking shoulders.
Working notes
Thirty seconds, done properly
| Check | Correct | Common fault |
|---|---|---|
| Hip height | Level with shoulder and ankle | Hips high (pike) or low (sagging) |
| Shoulder | Directly over the wrist | Shoulders in front of the wrists |
| Ribs | Drawn down toward the pelvis | Ribs flared and chest dropped |
| Neck | In line with the spine | Chin lifted or dropped |
A plank held with a sagging lower back trains the lumbar spine to hang on its ligaments and puts the load where you do not want it. Thirty seconds with the ribs knit down and the pelvis level does more for the core than two minutes of hanging. If you can hold a sloppy plank for three minutes, you have trained yourself to hold a sloppy plank.
The measurement that matters is not the clock but the line. Film yourself from the side once: the ear, shoulder, hip, knee and ankle should sit close to one straight line.
What the shaking means
Shaking in the arms and abdomen in the first weeks is normal: the muscles are learning a position, not failing. Shaking that continues past about 45 seconds usually means the pose is being held by the arms alone because the legs have switched off. Press back through the heels and squeeze the thighs — the load redistributes and the shaking usually stops.
If the wrists hurt rather than the shoulders, the hands are too far forward or the fingers are not spread. A rolled mat under the heel of the hand changes the wrist angle by about 15 degrees and often removes the pain entirely.
Self-checks
- Can you lift one foot 5 cm without the hips dropping?
- Is the lower back flat rather than dipped?
- Are the shoulders still over the wrists after 20 seconds?
Safety
Skip or heavily modify the pose if any of these apply to you. When in doubt, ask a teacher who can see you move, or a clinician who knows your history.
- Wrist injury or carpal tunnel syndrome: use forearms or a wall instead.
- Shoulder impingement or a recent rotator cuff injury: keep the hold short or skip.
- Diastasis recti or an abdominal hernia: use the knee-down version and keep the abdomen supported.
- Pregnancy after the first trimester: use the wall or knee-down version to avoid loading the abdominal wall.
- High blood pressure: keep the hold short and breathe continuously rather than straining.
This page is informational only. It is not medical advice and no pose here is a treatment for any condition.
- Knees down, hips forward of the shoulders, to reduce the load by roughly 40 percent.
- Forearms on the floor instead of the hands, which takes the wrists out of the equation.
- Hands on a wall at chest height, feet back, for a standing plank when the floor version is too much.
- Forearms on a chair seat or a bench, to keep the line while reducing the angle.
Useful propsMat · Block · Wall
- A block between the upper thighs teaches the leg engagement that keeps the pelvis level.
- A rolled mat under the heels of the hands reduces wrist extension.
- A mirror or a phone camera on the floor is the only reliable way to check the line.
- Wrist injury or carpal tunnel syndrome: use forearms or a wall instead.
- Shoulder impingement or a recent rotator cuff injury: keep the hold short or skip.
- Diastasis recti or an abdominal hernia: use the knee-down version and keep the abdomen supported.
- Pregnancy after the first trimester: use the wall or knee-down version to avoid loading the abdominal wall.
- High blood pressure: keep the hold short and breathe continuously rather than straining.
Steady, quiet breathing for the whole hold; if you cannot speak a short sentence at the end, the hold was too long.
- Count five breaths instead of thirty seconds and the strain response is smaller.
- Exhale as you press the floor away; inhale to keep the ribs down.
- Never hold the breath to buy extra seconds.